By predefining your service offerings in Scoro, you'll save time on double data entry when creating financial documents and gain insightful reporting on your services.
Explore the step-by-step GIF guide below to learn how to add services and predefine cost and selling rates to standardize your service offering and sales process. If you’re interested in more advanced features or importing a list of products and services, you can find some pro tips and a link to other detailed articles at the bottom of this page.
Jump to...
1. Pros of predefined services
Before adding services to your Scoro site, it's helpful to understand how this data impacts all parts of the platform.
While you have the flexibility to modify product data and price for each project or document, establishing a standard cost and price for your team can help you ensure that no one deviates too far from the expected profit margin.
By predefining products and their cost and prices, you can save time on double data entry and ensure consistency across your team when creating sales and finance documents:
- Accelerate the sales process and secure margins with standardized quotes
- Charge accurately when creating invoices
- Manage costs effortlessly with predefined values for expenses, bills, and purchase orders.
By adopting a standardized approach to quoting and invoicing, you not only automate document creation but also gain the ability to generate reports with comparable data:
- Analyze and contrast results from different projects and clients
- Identify which services sell best and generate the highest margin
- Determine which suppliers are most suitable for different needs.
2. Compile your service list
To ensure that the products you list on your Scoro site align with how you track business performance, we recommend first identifying the services you provide and want to get reports on.
For example, a creative agency could add products like website development, design, or copywriting. This way, they can later leverage automated reports to evaluate the profitability of each service.
When ready to add your products to Scoro, navigate to the products and services list under Settings > Sales and Finance > Products and services.
To add a new product:
- click the +New button in the product list
- Name your product or service
- You can add detailed information about the service in the Description field to keep you and the customer on the same page regarding the expected deliverables. The service description is automatically prefilled when adding a service to a quote, but you can change it as needed to customize the offering for different projects.
Consider grouping your services if your company offers a wide range of services. For example, you could create a copywriting product group and offer specific services like website copywriting, SEO copywriting, and ad copywriting.
By grouping your services, you can speed up quote creation by selecting the product group and the specific service instead of scrolling through a long list of services. Product groups also add an additional layer to your reporting.
To use product groups, enable Product groups under Product add-ons first.
You can also enable the Product codes add-on to add unique product identifiers to your services. If enabled, you can select services by their product codes when creating quotes, orders, and invoices.
3. Define default cost
As you add your services to Scoro, you can set their default cost. This way, you'll benefit from automated cost estimation when compiling quotes.
First, select whether you're adding an in-house service delivered by someone on your team or an outsourced service you purchase from a supplier or freelancer and resell to your customer.
3.1. In-house costs
If it's an in-house service, the cost estimate will be taken from the hourly labor cost of the team member doing the work.
If you've already added your team to Scoro, you can add a default doer for every new product you create. If you have enabled and added roles to your site, you can also set a specific role as a default doer. By defining a default doer or role, whenever you create a quote to sell the service, the estimated delivery cost and the expected margin are automatically calculated based on the default doer's labor cost.
Defining the role as the default doer is especially handy if you know what skill set you need to deliver the service but have multiple team members who can carry out the work.
For example, suppose one of your Junior Architects always does Schematic Design for your clients. However, which Junior Architect is assigned will depend on team member availability when launching a new project.
If the quote matrix is enabled for your site, you can assign multiple in-house providers for a product or service. Simply click the Add provider button, select a role or a specific user, and then enter the quantity of work they'll provide.
When adding a product with multiple providers to the quote, all providers will automatically be added to that quote line item.
Learn more about the quote matrix.
3.2. Outsourced costs
When adding an outsourced service, you can fill in the Buying price to predefine the service cost. This is the amount you expect to pay to your supplier. This way, your margin is automatically calculated whenever you quote this service to the client.
Let's say your business offers website development, and sometimes you need photos for the company websites you work on. You don't have an in-house photographer, so you outsource this service and have agreed on a fixed price with the provider.
4. Set the selling price
Once you have determined the cost of a service, the next step is to set its selling price.
In Scoro, we support several pricing options. Our two most popular pricing models are flat fee pricing and hourly rate pricing. Let's explore each option so that you can decide what works best for your business.
4.1. Flat fee pricing
Flat fee pricing involves charging a fixed amount for a particular service. This approach is often used for repeatable services that businesses have already delivered several times and where it takes roughly the same effort each time, regardless of the customer. This way, managers can use the data from other projects to determine the flat fee price that covers delivery costs and guarantees profitability.
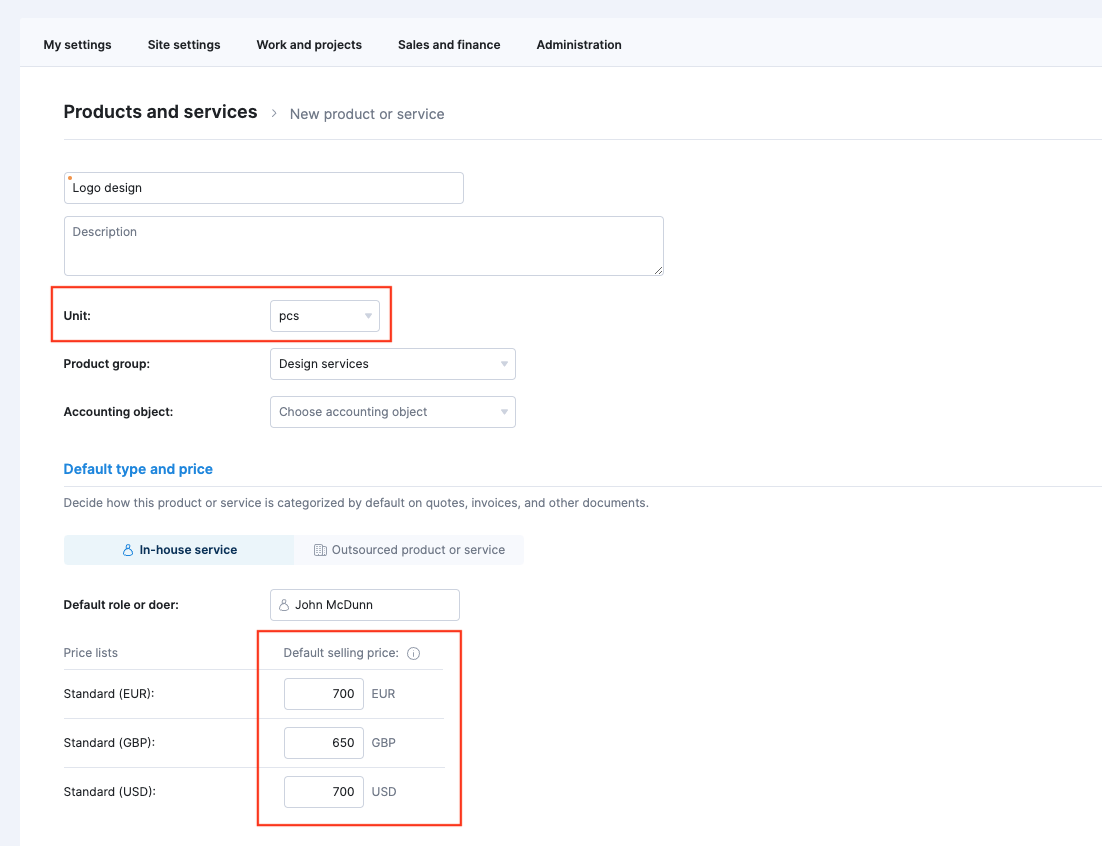
Let's say you offer a logo design service, offering businesses three logo variations and print-ready files of the selected design. Having offered this service for some time, you have determined its scope and cost, and transformed it into a fixed-rate package worth $700.
When adding this service to Scoro, set the unit of measure to 'pcs' and input the selling price as $700.
4.2. Hourly rates
Hourly rates are used when the total price of the service depends on how much time is needed to deliver it. In this instance, although the deliverables are similar in each project, the scope can vary based on individual customer needs. There are two options for determining hourly rates in Scoro: service-based hourly rates and role-based hourly rates.
Service-based hourly rates
The price for the service-based hourly rate depends on the service provided. Regardless of who performs the work, the price to the customer remains consistent. Meanwhile, your profit margin will vary based on the labor cost of the employee who delivers the service.
For example, a creative agency may use an hourly rate of $120 to estimate fees for a copywriting service. The total price for the service is calculated by multiplying the hourly rate by the hours required to deliver the service.
If a deliverable is expected to take 10 hours at the hourly rate of $120, the estimate for the web design service would be $1200. In contrast, a larger task that requires 20 hours of work would result in an estimate of $2400.
You can set up the service-based hourly rate in the same view you create the product or the service. Just select hours (hrs) or days (day) as the unit of measure and add the default hourly or daily selling price for the particular service.
For example, if your business charges $120 per hour for web design services, you would select 'hours' as the unit and enter $120 as the selling price. The buying column is not applicable here and remains empty as this cost for in-house services is taken from hourly labor cost settings.
Role-based hourly rates
Role-based hourly rates are used by businesses that determine the selling price for their services based on the team member who actually carries out the work. Pricing decisions are based on skill sets, seniority, experience, responsibilities, labor costs, and other relevant factors.
For example, if a web design service is provided by a Senior Designer, you may charge $150 per hour compared to $120 for the work of a Junior Designer. By establishing specific roles and role prices, team members with different skill levels can collaborate on the same task while having their respective hourly selling prices automatically recorded for every minute they log.
When using role-based pricing, you would still start by setting up services under Settings > Sales and Finance > Products and services. Ensure that any services provided by your team are marked as in-house with hours as the unit of measurement. When setting up these services, leave the selling price field blank, as the price will be automatically determined based on the role prices page.
Once you've finished the product list, head to enable role-based prices at Settings > Sales and finance > Roles. You can then see and manage the list of roles in that same view.
Click on the New button to add a new role. This takes you to the role modify the view, where you can name the role, define the default selling price, and add users to it. You can assign as many team members to one role as you wish, but every team member can only be in one role.
To recap, creating a product list in Scoro with accurate service delivery costs and selling prices will enable you to automate sales and finance document creation and generate meaningful reports. If you're interested in exploring any topics covered in this article further, check out the additional resources below. Once you're ready, move on to the next step in your Getting started journey, which will guide you through adding leads, customers, and suppliers to Scoro.
Click the Translations and Additional details dropdowns to access the product translation and other additional settings.
5. Deactivating products and services
You can always remove the products and services your team no longer uses by deactivating them. Deactivating a product or service won't affect historical data – all quotes, invoices, and other documents using the deactivated product remain unchanged. The deactivated product will no longer be suggested when creating new documents in Scoro.
To deactivate a product or service:
- Go to Settings > Sales and Finance > Products and services.
- Disable the checkbox in the Active column for the product you want to deactivate.
You can access all your deactivated products and services by clicking the Status filter and selecting Inactive products.
6. Export products and services
You can easily export any products and services from your product database in Scoro:
- Go to Settings > Sales and Finance > Products and services and select the products you want to export. Both active and inactive products can be selected for export. An additional bar with bulk actions will appear.
- Click the Export button and select your preferred file format (CSV or XLS). If you've selected the CSV format, you can also specify what is used as a column separator - a comma, a semicolon, or a tab. Lastly, click Export to export the selected files.
7. Sharing products between entities
Products and services can be easily shared among multiple entities enabled on your site. You can do this:
- When creating a new project or modifying an existing one
- In bulk from the product and service list
Note! Once a product shared between entities is used on a document (quote, invoice, etc.) in either entity, it can no longer be unshared with that entity. As a workaround, you could deactivate this product and simply create new products separately for the necessary entities.
To share a product between entities while creating or modifying it:
- Click on the Additional details section to expand the advanced settings.
- Enable the Shared between entities checkbox – this will display all additional entities enabled on your site. Enable the checkboxes next to the entities you want to share this product with.
To share multiple products between entities at once:
- Go to Settings > Sales and finance > Products and services, and select the products you want to share by ticking the checkboxes next to them.
- Click the Share with accounts button, select the entities you want to share the products with, and click Share with accounts to confirm.
8. Improve efficiency with these pro tips
8.1. Organize products into groups
If you sell many services, consider organizing your product list into groups. This will add another layer to your reporting as well as help you compile financial documents more efficiently.
For example, when creating a sales or finance document, you can select the product group first. This will narrow down the product selection (only services in that group are shown) and helps to find the required service faster.
To use Product groups, first, enable them under the Product add-ons tab under Settings > Sales and Finance > Products.
Once enabled, you will see the Product groups tab. Click on it to create product groups.
If required, you can divide these groups into even smaller segments. For instance, you might have a group named 'Development' with subgroups such as 'Front-end development' and 'Back-end development'.
Next, return to the Products and services list to organize your products into groups. Select the services you wish to group together, and the bulk actions menu will automatically appear. From there, you can assign these products to any of the groups you previously created.
8.2. Customize product units
Units are used on all sales documents and can be created, modified and deleted. You also use units when adding flat-fee or service-based products or services. By default, Scoro has the following units: day, hour, minute and pieces.
If your business uses another measure of the unit to compile sales documents, such as half a day, week or a month, head to Settings > Sales and finance > Units and click Add unit.
8.3. Add services as you go
In addition to setting up services as you onboard Scoro, you can add them on the go when compiling quotes. Whenever you add a service that's not in your database to a quote, it will be automatically saved to your product list once you save the document.
To do this, type in the service name and then click the [+] icon that appears. This will activate a product pop-up window, where you can input all the relevant information required to set up the product in a standardized way, much like when going through the Settings panel.
While this functionality offers great flexibility when starting with Scoro, we recommend disabling the option for larger teams in the long run. If enabled, every team member who creates a quote can add their own version of a service or product, disrupting your standardization efforts and reporting.
To make sure your services list is organized and the team only uses your predefined services, go to Settings > Sales and finance > General and untick the Ability to add new products/services when creating new sales documents checkbox.
8.4. Set up accounting objects
Consider setting up accounting objects to add another dimension to your reports. Frequently, larger companies use accounting objects to associate deliverables with a specific division or department.
For example, accounting objects could include IT, Marketing or Design, representing the respective departments. Once linked to a product, the accounting object is automatically assigned to it whenever compiling financial documents.
If several departments deliver the same services, you can always change the accounting object against each product when scoping a quote. This way, you can later correctly analyze how much revenue each department brings to the business.
If you wish to use accounting objects, activate the feature under Settings > Sales and finance > Accounting objects by ticking the respective checkbox.
8.5. Enhance product descriptions
In addition to simply adding a list of products to your site, you can use additional cues to ensure your team or the clients are clear of the expectations. Here are some ideas:
You can use brackets [ ] in the product name to include information visible to your team that can help them compile quotes accurately. Whatever is included in the brackets, is not visible to the customer. For example, for your 'UX design' service you may need to remind your team that the service price should not be changed to win deals e.g. 'UX design [no discounts on this service]'.
When compiling a product list, you can use product description fields to include additional information for your customers or internal usage. We recommend including product specifications in the first description. For example, if you offer social media copywriting service, you may use this space to outline the platforms you write for and the type of posts.
Use the secondary product description field for internal notes to your team. For instance, you can specify that video script copywriting is not included in your services to prevent the sales team from promising clients something beyond the scope of the service.
8.6. Build price lists
Suppose your product prices vary based on the markets you operate in or client-preferred currencies. In that case, you can also automate quoting and estimating by setting up price lists (i.e. rate cards) under Settings > Sales and finance > Products and services > Price lists.
The default price list is used for all new clients that don't have a specific price list linked to their profile. However, you can create multiple price other price lists and link your clients to match your internal pricing strategy.
For example, if you operate in the EU, you can set your default price list in EUR. In addition, you can create a price list using USD and GBP for the US and UK customers, respectively. This way, you won't have to rethink the pricing strategy when pitching to a new customer in a different market.
After you've created price lists, you can link certain products/services with different price lists. This way, when a client is linked to a price list, and you create a sales document for that client, the correct prices are automatically filled in for products/services used on the quote. Go to Settings > Sales and finance > Products and services, click on the product name to add selling prices used for different price lists.
Once the price list has been added, it is displayed in the sales or purchase document Modify view.
To recap, creating a product list in Scoro with accurate service delivery costs and selling prices will enable you to automate document creation and generate meaningful reports. If you're interested in exploring any topics covered in this article further, check out the additional resources below. Once you're ready, move on to the next step in your Getting started journey, which will guide you through adding leads, customers, and suppliers to Scoro.